I had to uninstall Ubuntu from my machine due to some reason. I again installed Ubuntu 7.10 on my last night. I wanted to upgrade it to 9.04 (Jaunty Jackalope). I tried doing to using Upgrade Manager (System -> Administration -> Upgrade Manager) but it upgraded it to 8.04. I then came to know that I can not upgrade directly to 9.04. I have to pass through all the versions in between. So, I upgraded to 8.04. After upgrading to 8.04, I tried to upgrade it to 8.10 (next release after 8.04) but it did not work. I always said "System is up to date".
I googled online but found no luck (May be I did not try hard. I am a lazy ass ;-) ). Finally I got solution from http://twitter.com/be3 on Twitter.
It's very simple. Go to Console and type update-manager -d
It then upgraded to 8.10 (as I said, we need to pass through all intermediate releases). I should hopfully be able to upgrade to version 9.04. :-)
Showing posts with label Open Source. Show all posts
Showing posts with label Open Source. Show all posts
Sunday, May 31, 2009

Wednesday, March 18, 2009
Installing / Uninstalling Netbeans
Installing Netbeans in just three steps process
Open the terminal, locate the directory where netbeans is installed and run sh uninstall.sh
Simple as that :-)
- Go to http://www.netbeans.org/downloads/start.html
- Download the package you are looking for.
- Open Terminal, Go the directory where Netbeans in downloaded and type sh netbeans.sh (whatever is the name of the downloaded file.)
Open the terminal, locate the directory where netbeans is installed and run sh uninstall.sh
Simple as that :-)
Command not found
I was trying to uninstall NetBeans from my Linux box. I tried sudo ./uninstall.sh but every time (just to make sure 'm typing everything correctly) it gave me Command Not Found error.
Finally, I found the solution as
chmod a+x uninstall.sh
use SH command.
sh uninstall.sh
This works perfectly. :-)
Finally, I found the solution as
chmod a+x uninstall.sh
use SH command.
sh uninstall.sh
This works perfectly. :-)
Sunday, March 1, 2009
Removing unwanted files from Ubuntu
Removing unwanted (tmp) files from Ubuntu is very easy.
Open the Terminal window and run: sudo apt-get autoclean
This will delete all the unnecessary files from the computer.
This can fail if Synaptic package manager or any other installation manager is running.
source: http://www.ubuntugeek.com/how-to-fix-lock-varlibdpkglock-open-11-resource-temporarily-unavailable-error.html
Open the Terminal window and run: sudo apt-get autoclean
This will delete all the unnecessary files from the computer.
This can fail if Synaptic package manager or any other installation manager is running.
source: http://www.ubuntugeek.com/how-to-fix-lock-varlibdpkglock-open-11-resource-temporarily-unavailable-error.html
SSH in Ubuntu
When I was using Vista, I used to use Putty / X-Win to SSH to my Server.
But doing that on Ubuntu (or any Linux/Unix box for that matter) is very simple.
Go to Terminal Window.
Run ssh username@hostname/IP address
Enter your password when prompted.
You can exit from SSH using exit command.
That's it.
Isn't it simple?
Note: Though Linux version of Putty is available, using Terminal Window is much simple to use.
But doing that on Ubuntu (or any Linux/Unix box for that matter) is very simple.
Go to Terminal Window.
Run ssh username@hostname/IP address
Enter your password when prompted.
You can exit from SSH using exit command.
That's it.
Isn't it simple?
Note: Though Linux version of Putty is available, using Terminal Window is much simple to use.
Installing MySQL on Ubuntu
Go to Terminal Window and run sudo apt-get install mysql-server libapache2-mod-auth-mysql php5-mysql
You will be asked to enter your ROOT password. The screen looks like this
 When the installation is complete, run mysql -u root -p
Enter root password when prompted.
If no error message is displayed, MySQL installation is successful.
source: http://ubuntuexperiment.wordpress.com/2008/11/10/installing-apache-php-mysql/
You will be asked to enter your ROOT password. The screen looks like this
 When the installation is complete, run mysql -u root -p
Enter root password when prompted.
If no error message is displayed, MySQL installation is successful.
source: http://ubuntuexperiment.wordpress.com/2008/11/10/installing-apache-php-mysql/
Installing PHP5 on Ubuntu
Go to Terminal Window and run sudo apt-get install php5 libapache2-mod-php5
Now restart the Apache Server ( sudo /etc/init.d/apache2 restart )
To test if installation was successful or not, lets create one test file, run the following command. sudo gedit /var/www/test_file.php . This will open up gedit editor. Type . Save the file and close gedit.
Now open your favorite Web Browser and go to the URL http://localhost/test_file.php
You should see something like this.
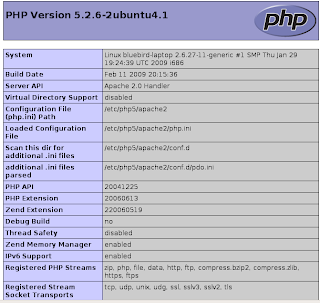
Source: http://ubuntuexperiment.wordpress.com/2008/11/10/installing-apache-php-mysql/
Now restart the Apache Server ( sudo /etc/init.d/apache2 restart )
To test if installation was successful or not, lets create one test file, run the following command. sudo gedit /var/www/test_file.php . This will open up gedit editor. Type . Save the file and close gedit.
Now open your favorite Web Browser and go to the URL http://localhost/test_file.php
You should see something like this.

Source: http://ubuntuexperiment.wordpress.com/2008/11/10/installing-apache-php-mysql/
Installing Apache WebServer on Ubuntu
Hi,
'm coming from Windows background.
I used to use WAMP / XAMPP on windows.
Now I 've switched to Ubuntu and 'm loving it.
I was trying to install Apache WebServer on my machine. I googled a bit and found the solution. I didn't knew installing Apache on Linux could be so easy.
'm coming from Windows background.
I used to use WAMP / XAMPP on windows.
Now I 've switched to Ubuntu and 'm loving it.
I was trying to install Apache WebServer on my machine. I googled a bit and found the solution. I didn't knew installing Apache on Linux could be so easy.
- Go to Terminal Window.
- Type sudo apt-get install apache2
- Enter the root password when prompted.
- When installed, open your Web Browser and go to URL http://localhost , If it has been properly installed, you should see It Work's!
- Now try restarting the server, sudo /etc/init.d/apache2 restart . If you receive any error like
apache2: Could not reliably determine the server's fully qualified domain name, using 127.0.1.1 for ServerName
... waiting .apache2: Could not reliably determine the server's fully qualified domain name, using 127.0.1.1 for ServerName - Run the command gksu gedit /etc/apache2/conf.d/fqdn . This will open up GEdit. Enter the following in it: ServerName localhost
- Now you should be able to restart your Apache. Try it out :)
Saturday, February 28, 2009
Removing file / folder forcefully
In Ubuntu (or any Linux based OS for that matter) have all folders starting with . (period) as hidden.
These folders will not be displayed with run ls command.
If you want to see the hidden files too, use ls -l command.
I was trying to delete one folder containing 2 files (I guess they are worms / virus in windows) Desktop.ini and Folder.htt . I tried deleting it using Delete Button on Keyboard. I also tried Shift+Delete (I know it doesn't matter) but it didn't work.
Finally after googling a little, I found the solution.
Forcefully delete them.
These folders will not be displayed with run ls command.
If you want to see the hidden files too, use ls -l command.
I was trying to delete one folder containing 2 files (I guess they are worms / virus in windows) Desktop.ini and Folder.htt . I tried deleting it using Delete Button on Keyboard. I also tried Shift+Delete (I know it doesn't matter) but it didn't work.
Finally after googling a little, I found the solution.
Forcefully delete them.
- Open terminal
- Go to the folder you wish to delete.
- Delete all the files in that folder using sudo rm * (enter your root password when prompted).
- Now go up one directory using cd .. command.
- Now run sudo rmdir foldername
Extracting RAR file on Ubuntu
I recently installed Ubuntu on my machine.
I had Vista earlier. I was fed up of Vista.
This is Ubuntu is awesome. Never gets freezed.
I got some ebooks, I needed urgently, from one of my friends. But it was in .RAR format.
I was wondering if there's any RAR extractor for Linux.
I used to use WinRAR on Windows.
I searched online and found the command to install it on my machine.
It's simple.
Open Terminal (On Ubuntu: Application -> Terminal)
Type: sudo apt-get install rar
and it's done.
How to use UNRAR?
Type: unrar help
You will see bunch of options that can be used with unrar.
To just extract the files on your current drive, use..
unrar e filename.rar
I had Vista earlier. I was fed up of Vista.
This is Ubuntu is awesome. Never gets freezed.
I got some ebooks, I needed urgently, from one of my friends. But it was in .RAR format.
I was wondering if there's any RAR extractor for Linux.
I used to use WinRAR on Windows.
I searched online and found the command to install it on my machine.
It's simple.
Open Terminal (On Ubuntu: Application -> Terminal)
Type: sudo apt-get install rar
and it's done.
How to use UNRAR?
Type: unrar help
You will see bunch of options that can be used with unrar.
To just extract the files on your current drive, use..
unrar e filename.rar
Subscribe to:
Posts (Atom)